My Blog List

Wednesday, January 13, 2016

WHAT! ANOTHER ROCK

When David was out cutting down some trees a few weeks ago I spotted a rock that I knew I could find a place for in my garden. To my eyes it was a beauty; full of character and that perfect, weathered shade of grey.


If you have visited my garden you know just how many rocks have been moved from out there to in here. In fact our garden would be nothing without its rocks.
This is an area I redid recently. A corner by the pool; another layer of rocks to make this area more of a rock garden. Many plants have lived in this spot. I started with a rosemary plant that became to big. Then an Agave demettiana which succumbed to the freeze. Next came a soft leaf yucca which succumbed to the agave weevil. Now I am planting hardy natives such as santolina, blackfoot daisy, a low growing iris and scatterings of California poppies. I want to keep the plants low so the rocks will always take pride of place. Not so easy here as few plants stay small and manageable.


Rocks maintain interest in the winter garden when all that remain are the more structural agaves and grasses. No color to be found yet. That will have to wait for spring.


And they make a great transition from one level to another.


Not to mention their usefulness as a retaining wall. These rocks I collected during construction knowing I would build this dry-stone wall.


I like to take my cue from the land where there are some pretty amazing rock walls. I love this one, close by our house, over which water rushes when there are heavy rains.


You have to do something when you have terrain like this.


On the surface you may see nothing but underneath there is buried treasure.

So exactly what did I do with that rock I found. Actually, I put in an order for more! I decided to redo the area in front of the large window in the front courtyard. Originally there were 3 white Indian Hawthornes. I had never pruned them and they grew rather straggly, never flowering. A flowering Senna seeded there. It was lovely but if you know much about those trees you are lucky to have one grow with a nice shape. They tend to send out branches at all angles. But they are pretty when they bloom. It was leaning forward trying to reach more sun.
This area never warranted a photograph so I have none to share of how it looked but I knew it needed to be redone. One day I just let loose with the pruners and saws and by the end of the day the area was bare. Now I could begin to think about what I was going to do there. Of course with the dry creek running alongside it was going to involve rocks and that rock was going to find a home right there. That is why I needed a few more rocks.
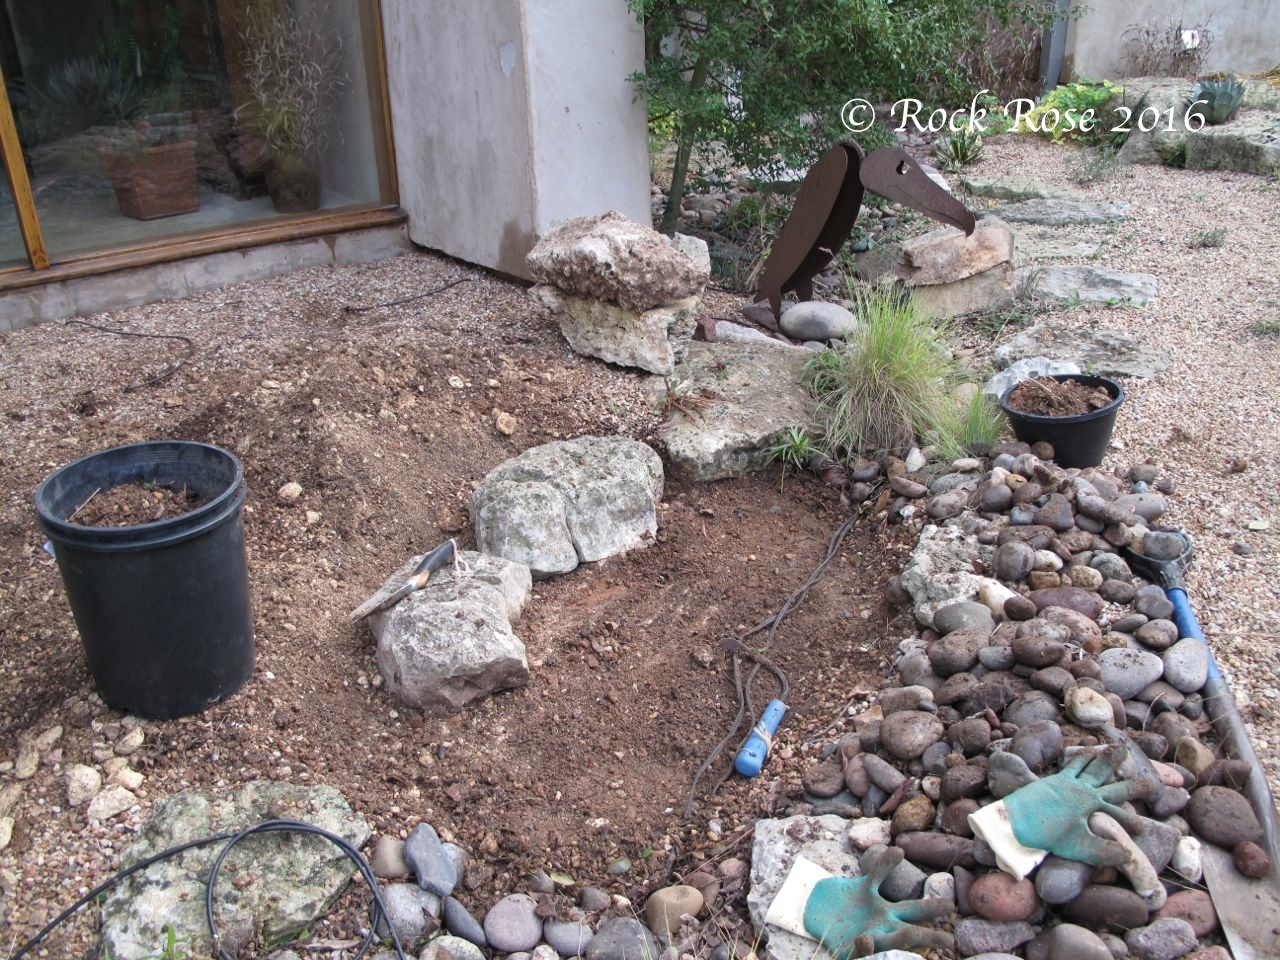

The first job was to remove all the river rocks and clean out all the debris. This is something that has to be done every few years because plant material builds between the stones. Then I started to position the stones along the edge of the dry creek. This is always trial and error and these rocks are very heavy. First attempt failed but here's that nice rock placed on the second attempt.


The final ledge and river rocks replaced.


I plan to plant along the edge to soften the look of the area and add new gravel. I was also thinking of getting a new pot until I looked at the prices of large ones at the nursery today. (Unless we win the lottery tonight!) This old pot works quite well and it will be a matter of deciding what to plant in it. Also maybe a few grasses to soften the area around it. My other thought was to make a rectangular water feature which would be poured in place. But that would be more work.


For now I am playing around with ideas.

Saturday, January 9, 2016

BURSTING AT THE SEAMS

Think this is my greenhouse or potting shed?


No!  My potting shed is full; all surfaces filled with tender succulents and citrus. It stays well above freezing in there. A west facing window gives plenty of winter sun to cactus and succulents.


My greenhouse? Filled with the more hardy plants, that can withstand cold temperatures but not freezing. It warms up during the day and the thermal mass of water-filled bottles and plants usually keeps the temperature well above freezing.


It's my laundry room. It's the place where I keep my orchids during their non flowering season. They can't withstand too much cold so 65º is just about right for them. Throw them away after they finish flowering? Never. Also, I have to have a warmer place to keep seeds while they dry out. These are Cascadia peas which have been prolific right through until this last week.


and these bunny ear cactus pads I discovered on the ground yesterday.


I left them to dry overnight in the greenhouse but today I noticed the base of the pads were showing signs of rot. We have had so much rain this fall and coupled with cold it has not been good for the succulents. But, I know they can be saved so I took a knife and cut off the bases down to good tissue. It's rather like being a dermatologist going deeper and deeper making sure he remove all the cancerous tissue. I had to makes several cuts before I was down to healthy tissue. Now they will stay in the laundry room until they callous over after which time I will pot them up in a well drained soil.


Cactus and succulents can be so forgiving if you remove all the unhealthy tissue, heal and replant. I have done the same with a sharkskin agave and a Spanish bayonet yucca. The center of the sharkskin just pulled right out but I replanted and it is growing again. The yucca had been attacked by weevils but I cut back to good tissue an replanted.


Wednesday, December 30, 2015

TO PICK OR NOT TO PICK

My little calamondin orange tree, Calamondin X Citrofortunella mitis, never fails to produce a winter crop of delightful small fruit and is the only one of my potted citrus favored with a place in the house over the winter. It can do no wrong. In spring the air is perfumed by its flowers, the foliage stays bright green throughout the year and the fruits are perfectly formed spheres of orange. Native to China the calamondin was introduced to North America around 1900. It is one of the hardiest of the citrus and will withstand temperatures down to 20º It is perfect for container culture.


This year, unlike my other citrus, the tree overcame a battering from hail in late spring which removed all citrus flowers. Lemons and limes called it quits but the calamondin produced another flush of blooms to delight us once again during cold winter days.


A little research led me to a recipe for calamondin orange marmalade. Being of English heritage we grew up eating marmalade on our breakfast toast, and still do. Not the sweet orange marmalade that is sold here but marmalade made from bitter Seville oranges grown in Spain. Calamondin fruits are very tart so maybe marmalade made from them would be more similar to that made from Seville oranges. I decided to give it a try.


First of all I had to overcome the urge to just leave the fruits on the tree. Maybe I could start by making a couple of jars just to make sure I liked the end product. I found the easiest way to deal with the fruit is to cut the fruit in half, remove the pips and squeeze the juice into a glass measuring jug. There is very little pith so the whole fruit can be used.


Just a quick pinch between the fingers and remove any stray pips, then cut the remaining peel with pulp into fine strips.


I tied the pips in a muslin bag as I had seen my mother do when she was making jams. It is supposed to be a source of pectin.


Then it all went into the pan along with ¾ cup of water for every cup of peel and juice. Boiled down for about 15 minutes and then into the fridge overnight to develop the pectin needed for jelling.
Next morning I measured the contents and added some more water, 1cup of sugar for every cup fruit and boiled down until the jelly stage was reached at 220º I also like to test putting a small amount on a very cold plate to see if it wrinkles when a finger is drawn across. I potted up but not before I had a little taste. Good and tart-perfect.


You can be sure as that all the other little oranges will get the same treatment next week. For now we will enjoy the little tree with its winter bounty for a few more days.

Sunday, December 27, 2015

CHRISTMAS EVE AT THE DESERT BOTANICAL GARDEN

This year we spent Christmas in Phoenix with family. There was lots to do in preparation for Christmas Eve and Christmas day but David and I managed to sneak out for a few hours Christmas Eve morning to visit the Desert Botanical Garden. It was just over a year since we were last there and as expected there were quite a few new features. If you think a garden with such magnificent structural plants doesn't need other kinds of structure, think again. Over the last 10 years we have watched as they added more and more hardscape to the garden.
Things haven't changed much at the entrance. The Chihuly sculptures still greet the visitor.


And there is a vertical wall of succulents.


Opuntia, Santa Rita welcomes us wearing its winter coat.


And you can't miss the newest member to the garden, The Boojum tree, Fouqueria columnaris, at 37' towering above all the other plants in the garden collection. The tree was donated by a homeowner in whose front garden it was growing. It will need support for a while until its roots grow big enough to support its height.


From Thanksgiving until Christmas Las Noches de las Luminarias welcomes visitors into the evening garden. As part of this event Bruce Munro showcases eight large scale light based installations using fibre optic lighting. It must be quite a spectacle. We saw several of these dotted among the cactus and large areas of lights on the hillsides.


We have long admired the raised beds using stacked stone but the new Jan and Tom Lewis Desert Portal enhances this similar style of wall with colored glass.


This has always been one of my favorite water features and I am sure in the early mornings and evenings birds and other wild life gather around here. I think may have painted the yellow wall since I was last there or was it just the wetness enhancing the color?


How beautifully this second water feature blends in with the native granite rocks and plants.


The third fountain is at the entrance to the Fine Family Contemplation Garden and features a zero edge wall.


A work in progress. Soon to be the Founder's Wall with circles of colored glass fitted into each of the metal circles. It won't be completed until January 2016, so next time!


Over the years color has been added to the garden in the way of structure. I'm pretty sure that when they were deciding on the color for the cactus an succulent galleries they took their cue from the flowering aloes.


Cactus and agaves themselves grow larger with each visit. Some of them grow old and not so pretty.


It's always comforting to know that when a plant fails it may not always be your fault.


It has the look of a very ancient font and maybe that's what it once was or was it possibly a repurposed, cantera stone column. Either way it makes for a very nice feature in this small courtyard area.


 I'm hoping that one day my Agave desmettiana Joe Hoak plants will share a spot with Agave desmettiana variegata but as neither are truly hardy here it will likely only ever be in pots.


And talking about hardiness Arizona is preparing for a few cold nights and they were out covering a number of plants with fleece.


And what was of favorite plant in the garden that day? Without a doubt this display of Agave victoriae-reginae.


It was yet another memorable visit to the garden.

Sunday, December 20, 2015

CHRISTMAS IS ALMOST UPON US

Best wishes to all who come to visit this page. It's time to shut down the computer for a few days and enjoy the festivities. My wishes are for all of you to have a wonderful time with your family.


Friday, December 18, 2015

PUTTING DAYDREAMS INTO ACTION

A quick week away from home had me lying under the casuarina's on a beautiful Caribbean beach. To set the mood for gardening thoughts I had been listening to a Gardeners' Question Time podcast on winter projects. I began to make plans for mine.


A couple of years ago I picked up two styrofoam boxes at a garage sale. Perfect for my plans to cover them with a mixture of hypertufa to make a lightweight trough. It never happened. Then I saw a posting on the Hypertufa Gardener blog about creating a faux hypertufa box. Basically rough up the surface of such a box, seal, and paint the surface to resemble stone. What a great idea. Thanks Kim.
I asked the person in charge of the garage storeroom where my boxes were. "I threw them away" came back the reply. You can probably imagine my reaction without my even telling you. But then a short time later, returning from some errands, David told me to come outside. He thought I would be very pleased. And so I was as he produced not one but three large styrofoam boxes  from the back of the truck.
 

On our return from our trip I thought it prudent to get busy before these too disappeared. What are the tools necessary for this project.
A stiff wire brush.
A sharp knife
Heat gun or simple gas barbecue lighter.
Mask.
Sheet of plastic to put under the work area.
Vacuum cleaner- it will be messy
Acrylic paints.
First thing was to cut off the lip of the box where the lid sat. You can see this on the lower box. Then I roughed up all the sides and the top edge to make a rounded lip. It only took about 15 minutes to do all the sides but it was snowing everywhere. Make sure your work area is out of a draught otherwise the fine beads will blow all over the place.
When you are happy with the surface pass a flame quickly over the box to seal the surface. I didn't have the heat gun which the Hypertufa Gardener had but my barbecue lighter seemed to work just as well as long as you are quick.

Box ready for painting
Then it's time for paint selection. I chose 2 colors of grey, beige and brown.


Pretty easy so far. Now for the hard part and I really mean the hard part. Being economically minded I didn't buy a large can of base coat. Instead I decided to stipple the surface using a thick paint brush and several different colors. It was taking forever and impossible to get in all the nooks and crannies. I gave up on the brush and started using a natural sponge which was what I used in my faux painting days. That was much better. The finish is starting to look more realistic and I may be able to live with this my first faux hypertufa trough.
Next I drilled a few holes in the bottom. Another mess. Next time I will do this at the same time I do the surface roughing. I have also been thinking about how I could make this into a self watering trough. But that is for the future.


I am going to experiment with growing potatoes in this one but will have to wait until next year. For the time being I took it outside, positioned it under the wall, in the spot where citrus spend the summer, and filled it with all the old potting soils that were lying around. I needed the soil out of the clay pots for the winter so there is no risk of spalling. And, I just happened to have a couple of hanging baskets of petunias left over from when Gardeners' Supply came in November.


Thanks Kim for this excellent project.

Wednesday, December 9, 2015

THE WINDOW BOX

For years I have struggled to keep window boxes looking worthy of a place in the garden. Partly my own fault for thinking that a hayrack would stand up to Texas summers -especially on a SW facing wall. I tried the coir liners with baby diapers in the bottom-was it the birds who were always removing the coir for their nests? Then I lined them with brown felt with an inner liner of landscape fabric. The problem was always keeping them well watered even though I had a drip system set up to water twice a day in summer. This year I found the answer. A self watering box.


I ordered the 3' Fairfield window box from Gardeners' Supply catalogue and am extremely happy with it. It is sturdy construction and guaranteed not to fade. It attaches to the wall with a strong support system which hooks underneath the box. There are two reservoirs in the base with holes so that roots can access the water. The reservoirs hold a total of 3 gallons. One thing I did do was to cut two lengths of sprinkler pipe which I sprayed black and placed down to each reservoir. Now it is easy to add water either by watering can or through the drip system. My plants are as happy as can be and I don't have to keep a constant vigil over their watering needs.


For my winter box I added ornamental cabbage, violas, snapdragons and stocks, California poppies and red flax from seed. This planter should provide winter interest through until late spring.
I am seriously thinking of buying a second box which I will plant up with summer plants to change out in late spring.
Check the website out. Almost everyone gives this box a 5* rating. The only dissenter was someone who had a problem with his order and not the product. The box only comes in white or black and one person did comment that the brackets shipped with the white one were also black. They had to paint them.
It was an easy purchase for me because Gardeners' Supply had been to film their new merchandise in my garden and had given me gift certificate for merchandise.
I have no hesitation in giving them a 5* for this product.